
Just like any creative venture, there are endless ways to go about creating a book of your own so don’t hold yourself back by thinking you have to wait for something particular to happen first. It’s just a matter of pullin’ off the bandaid and DOING IT!! If you’re a bit overwhelmed, well I feel your pain, I was in your shoes too. I had to break everything down for myself or else I felt paralyzed and didn’t know where to begin. This is why I’m writing this post today, to help anyone else out there who truly wants to start writing their book, but need some step-by-step direction to help you get there.
If you’re worried about what you’re going to do for publishing, I always say STOP and create the book you want to make FIRST. I only say this because it seems to me that the main reason people put off making that book they always wanted to make is because it’s really daunting to think about the writing AND publishing which can feel paralyzing. Working on the content of the book and working on the publishing of the book take completely different types of energy and sides of the brain. It's really important to stay in the creative mode when making the content so you’re allowing more creative flow to build momentum which makes for a more authentic outcome in the end. That said, there will be a tiny bit of research you may want to do regarding publishing a book which I will address below, but I will tell you specific things to think about at specific times to minimize overwhelm!
STEP 1. DECIDE ON A STORY IDEA
First ask yourself, what you love or what are you really interested in?
(Example: My story idea came to me after my husband and I moved to Bend, OR. We were absolutely loving exploring in and around town and couldn’t believe how much there was to see and do! So I decided to create a story around some of our favorite adventures in Bend.)

Then decide on who or what you want as the characters in your book. This can be people, animals, plants, objects, anything you want to bring to life in your story!
(Example: At that time, I was already making paintings of my long legged bird characters. And had started a Bend Bird Series which were birds that did different activities like rock climbing, fishing, and skiing. So I decided to bring these to life as the characters in my book!)
Then you take what you love and put it together with the characters you want to use and are ready to bring it all to life and start your story!
STEP 2. MAKE A SCHEDULE
Decide on the number of pages and word count you’d like overall. This is when you’ll need to do some of that research I spoke of.
(Example: I chose to do 32 pages total (including copyright page, title page, etc. and a word count between 450-500 words. I wanted it to be close to the industry standard in case I decided on going through a mainstream publisher.)If you’re illustrating as well, it’s important to think about the size of the book. You will need to make your illustrations larger than the size you plan to print them at for good quality images. (Unless you are illustrating your images in Illustrator or another vector-based design tool.) The size of your illustrations will also affect the time it will take you, so it’s good to do this in the planning stage : )

Create a calendar devoted to creating your book.
1) Pick a time frame you’d like to complete your book within.
2) Cross out all the days you already know you won’t be able to work on it including vacations. Be sure to work in breaks so you don’t burn out!
3) Then break up your daily tasks within that time frame with these task breakdown formulas (If you are doing both, I suggest picking a time frame for writing first and then illustrating second)
WRITING BREAKDOWN FORMULA:
Total word count divided by total number of days = # of words per dayILLUSTRATION BREAKDOWN FORMULA:
Total illustration count divided by total number of days = how many illustrations to finish per day(Example: My goal to get my book done was 90 days, I decided to work 5 days a week with a 1 week vacation which left me with 60 days total. I did all my writing in the first week so I had 55 days left for the illustrations.
My illustration formula looked like this:
14 illustrations total divided by 55 days = .25 illustration per dayIt was so helpful to know if I was on track each and every day or if I had to make up some time that weekend if I was falling behind)
This will take some trial and error of course and just know you’ll definitely need to adjust the schedule a time or two once you find out how long things are really taking you, but having a measurable goal each day so you can track your progress and see a light at the end of the tunnel is KEY
STEP 3. WRITE THE STORY
Create a rough outline to figure out how you want the story to flow. If it’s a traditional story format then write a brief outline of your beginning middle and end or if it’s more of a freestyle poem format then write anything you want to be sure to include and in what order so you have a roadmap for yourself to follow.
(Example: My book is written as more of a poem that takes you on a tour of Bend so in my outline, I wrote down all the places I wanted to include and in what order)
Then write out a whole first draft of the book – Don’t try to make it perfect! Just write it all out as it comes and don’t think of editing until after you’ve got your words out on paper.
Do a word count and see how far over or under you are from your word count goal.
Now, rewrite it as many times as it takes! As you rework your story and reach your word count goal, I suggest making sure this is spaced out over a few days so that you have time to step away from it when it feels done. Then you can come back to look at it with fresh eyes and perhaps make more changes.
Get feedback! After you’ve written your little heart out and feel happy about your story, then it’s important to get ready to ask for some feedback from people who have never read it before and be open to some constructive criticism.
(Example: I found it helpful to get feedback from people who I believed would be my target demographic: parents of kids between 2-8 living in Bend Oregon. I joined Bend parent facebook groups, looked for people on Instagram, and thought of anyone I knew who would fit that description. Then I reached out and just asked if they would be interested in reading my book! I actually did this after I finished all my illustrations, but looking back I would suggest getting feedback in two phases…once after you finish the manuscript and once more after you finished the illustrations.)*What to pay attention to when reading through your feedback: Any suggestions that are repeated by multiple people. If many people are noticing the same thing, it’s a great clue that there may be a disconnect or something off in your story that you overlooked and may want to rework it a bit. Overall, be sure to take each person’s feedback with a grain of salt since it can often be subjective, if you feel super strongly about something then always trust your own intuition first.
STEP 4. ILLUSTRATE THE STORY
Make a mockup of your book. This is really helpful in figuring out the sequence of your illustrations. I suggest doing it analogue style because it was way easier for me to picture the book including the cover and title page, but you can of course just do this digitally if that’s what’s easier for you!
(Example: I took a stack of blank paper and folded it in half. I made sure it had the same amount of pages of my book and then stapled it together.)
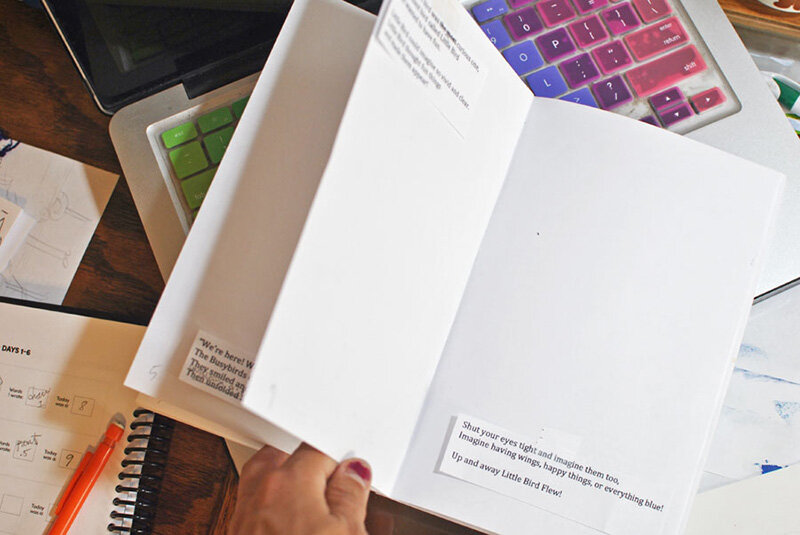
Print out your manuscript, cut the words into chunks, and tape them on each page. This helps you see how you’d like your words broken up and where you want them placed. Once you’re happy with your layout, you can then figure out your illustrations for each page and how the images will fit around the text.
Sketch out your drawings on your mock up to get a rough idea of how the whole book will flow.
Start Illustrating. Take your paper and paints or whatever materials you’re using and get creating! Every day check your calendar and track your progress.
STEP 5. GET FEEDBACK
Scan or photograph your illustrations and upload them on your computer.
Layer the text on top of your illustrations and refer to your mockup for placement.
Compile it in sequence as a PDF so that it’s all in one document.
*You will probably need to get your illustrations re-scanned/photographed professionally before printing so don’t worry about image size yet. Think of this as a digital rough draft of your book!Create a list of questions. Include anything you could ask that would help you improve your book like specific parts you may be unsure about or even what people like or dislike about the book.
(Example: I created an online survey through Survey Monkey so people could easily click the link and answer my list of questions.)Send your book (in PDF form) and survey link to people in your target demographic along with a variety of family, friends, and/or co-workers.
(Example: I gathered feedback from around 20 people in the Bend community and around 10-15 family and friends. The more the merrier!)
*Be sure to set a deadline for when you want the feedback by so you can work it into your schedule! Giving people a week was a good amount of time for me. Also, be understanding if they can’t do it and be appreciative if they do take the time to do it…perhaps even offer something in return if it feels right : )
Now take time to sort through all your feedback and implement changes. Take note of similar critiques by multiple people and any suggestions that resonate with you. Then schedule time to rework certain parts of the book until you feel like your book is finally complete.
STEP 6. CELEBRATE
Take a moment/a day/a weekend to celebrate this huge accomplishment!! This is a big win and as much as you will want to rush on to the next step of publishing, it’s SO important to recognize how far you’ve come. Getting your book out into the world is a huge undertaking and creating it is half the battle, so CELEBRATE darn it! You deserve it!
I hope this helps make your book writing process a little more doable. Wishing you lots of good vibes on this exciting journey! You got this. Once you have properly celebrated, feel free to check out my self-publishing guide here ; )
Keep On Creating!
Kristen